How to setup MongoDB Replica Set to Improve Redundancy and Availability

Implementing a replication strategy is one technique to increase the availability of your website, as services and websites are frequently unavailable due to a single point of failure brought on by crashes, OOM circumstances, etc.
MongoDB is no exception; many users, including mine, use this document-oriented database. I've observed many services running in a single MongoDB instance so frequently that chaos ensues when it fails.
Thankfully, one of the best things about MongoDB is how easy to set up replication, and in this article, I'll help guide you on how to set up and manage your MongoDB Replica Set.
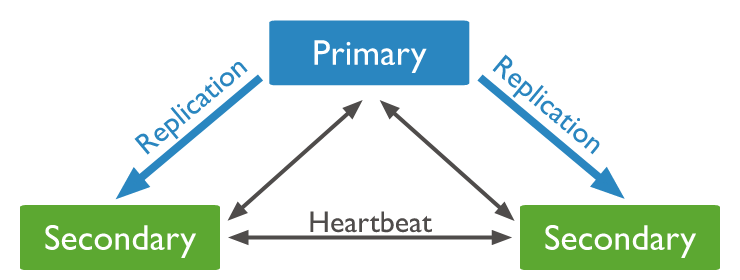
To start, we need to plan how many instances of MongoDB you need to begin deploying a replica set. In most basic setups and deployments 3 members of a replica set are sufficient to provide enough redundancy on network or system failures.
In my configuration, I ended up installing MongoDB in 3 different VM with the following network configuration:
- mongo-instance-1: 192.168.20.1
- mongo-instance-2: 192.168.20.2
- mongo-instance-3: 192.168.20.3
I am not including the installation process, but you could easily install each MongoDB by following the guide here:

Network Preparation
Since each instance of MongoDB needs to communicate with the others, we need to change the default network IP binding. To do this, enter the value below in your mongod config file:
# If the bindIp are listening to localhost, change the value
# to your hostname or IPs, but to make thing easier
# we are going to set the IP binding to listen on all
net:
  port: 27017
  bindIp: 0.0.0.0
Don't forget to restart the MongoDB services.
sudo service mongod restartOne of the thing that MongoDB recommend when deploying a replica set is setting up the hostname for each instance to prevent configuration issues when the host IP needs changing, this could be accomplished by setting up the values in the /etc/hosts file
ubuntu@mongo-instance-1:~$ cat /etc/hosts
127.0.0.1 localhost
192.168.20.1 mongo-instance-1
192.168.20.2 mongo-instance-2
192.168.20.3 mongo-instance-3Make sure every server can connect and the required port which defaulted to 27017 is opened and able to communicate with each server.
# ping the instance to check the connectivity
ubuntu@mongo-instance-1:~$ mongo --host mongo-instance-2
ubuntu@mongo-instance-1:~$ mongo --host mongo-instance-3

ubuntu@mongo-instance-2:~$ mongo --host mongo-instance-1
ubuntu@mongo-instance-2:~$ mongo --host mongo-instance-3

ubuntu@mongo-instance-3:~$ mongo --host mongo-instance-1
ubuntu@mongo-instance-3:~$ mongo --host mongo-instance-2
You might need to verify the hosts file configuration, the MongoDB service status, the instance network settings, or the firewall configuration if one of the commands doesn't work.
Generate Keyfile for Authentication
We'll create a Keyfile and set it up to enable a safe connection between MongoDB servers.
First, generate a Keyfile using the following commands:
ubuntu@mongo-instance-1:~$ sudo openssl rand -base64 756 > /etc/mongo-keyfile
ubuntu@mongo-instance-1:~$ sudo chmod 400 /etc/mongo-keyfile
Next, copy the generated Keyfile to each instance, and make sure the path and file permission is the same as with the mongo-instance-1.
After copying the Keyfile edit each instance MongoDB configuration to enable Keyfile Authentication:
security:
  keyFile: /etc/mongo-keyfile
Enabling the Replica Set
Now that the networking and authentication are already set up, we need to add the following line within the configuration to enable the replica set.
# rename the replSetName to your desired replica set name.
replication:
  replSetName: main-replica
After setting up the replica set name, restart each MongoDB service to enable the configuration.
Next, we need to initiate the Replica Set by accessing the mongo command line utility and executing the following command:
rs.initiate(
  {
    _id : "main-replica",
    members: [
      { _id : 0, host : "mongo-instance-1:27017" },
      { _id : 1, host : "mongo-instance-2:27017" },
      { _id : 2, host : "mongo-instance-3:27017" }
    ]
  }
)After executing the command, your prompt should be looking like this:
mongo-instance-1:PRIMARY>And connecting to another MongoDB instance will result in also looking like this:
mongo-instance-2:SECONDARY>Depending on the outcome of the election, a different PRIMARY or SECONDARY instance may be used, but all subsequent actions must be carried out within the PRIMARY instance.
Creating the Administrator User
When deploying the database to production, we must enable User Account Control, which necessitates the creation of an administrator user.
Please keep in mind that after you create the administrator user, localhost authentication exceptions are no longer available, and you must enter a username and password each time you connect to the database.
Run the queries below in the PRIMARY instance, and don't forget to set the password:
admin = db.getSiblingDB("admin")
admin.createUser(
  {
    user: "dba",
    pwd: 'put-your-password-here',
    roles: [ { role: "userAdminAnyDatabase", db: "admin" } ]
  }
)
Try using the command line to log in after creating the account:
mongo -u dba -p put-your-password-hereIf you are successfully logged in, then congrats the authentication are successfully configured.
Testing the Replica Set
After setting it up, you can view the replica set configuration by using the following command:
rs.conf()It should be resulting the following response:
mongo-instance-1:PRIMARY> rs.conf()
{
	"_id" : "main-replica",
	"version" : 1,
	"term" : 16,
	"members" : [
		{
			"_id" : 0,
			"host" : "mongo-instance-1:27017",
			"arbiterOnly" : false,
			"buildIndexes" : true,
			"hidden" : false,
			"priority" : 1,
			"tags" : {

			},
			"secondaryDelaySecs" : NumberLong(0),
			"votes" : 1
		},
		{
			"_id" : 1,
			"host" : "mongo-instance-2:27017",
			"arbiterOnly" : false,
			"buildIndexes" : true,
			"hidden" : false,
			"priority" : 1,
			"tags" : {

			},
			"secondaryDelaySecs" : NumberLong(0),
			"votes" : 1
		},
		{
			"_id" : 2,
			"host" : "mongo-instance-3:27017",
			"arbiterOnly" : false,
			"buildIndexes" : true,
			"hidden" : false,
			"priority" : 1,
			"tags" : {

			},
			"secondaryDelaySecs" : NumberLong(0),
			"votes" : 1
		}
	],
	"protocolVersion" : NumberLong(1),
	"writeConcernMajorityJournalDefault" : true,
	"settings" : {
		"chainingAllowed" : true,
		"heartbeatIntervalMillis" : 2000,
		"heartbeatTimeoutSecs" : 10,
		"electionTimeoutMillis" : 10000,
		"catchUpTimeoutMillis" : -1,
		"catchUpTakeoverDelayMillis" : 30000,
		"getLastErrorModes" : {

		},
		"getLastErrorDefaults" : {
			"w" : 1,
			"wtimeout" : 0
		},
		"replicaSetId" : ObjectId("6306e97e468ec52991273d45")
	}
}
After receiving the response, congratulations you now have successfully configured a replica set.