Improving PHP performance with OPcache
OPcache is a PHP extension that allows opcode caching and optimization by storing the precompiled script bytecode in memory, eliminating the need to read the code from disk and improving performance.

OPcache is a PHP extension that allows opcode caching and optimization by storing the precompiled script bytecode in memory, eliminating the need to read the code from disk and improving performance.
From PHP version 5.5 and beyond, the extension is included by default; in this article, I'll explain how to install and set up the extension to enhance PHP performance.
Installation
In this guide, I am using Ubuntu 22.04 and following the LEMP stack guide I posted here:
 Gema Aji Wardian
Before we install the opcache, please make sure your repositories are already updated by executing the following command:
sudo apt update && sudo apt upgradeBy default, opcache should be already installed when you install the PHP package, but to make sure you could execute the following command below to set the package to be manually installed.
# for default installation
sudo apt install php-opcache

# for specific php version (7.4 and 8.1)
sudo apt install php7.4-opcache
sudo apt install php8.1-opcache
You could view the PHP version and if opcache is installed by executing the
php -v command
nerdv2@nerdLaptop:~$ php -v
PHP 8.1.2-1ubuntu2.10 (cli) (built: Jan 16 2023 15:19:49) (NTS)
Copyright (c) The PHP Group
Zend Engine v4.1.2, Copyright (c) Zend Technologies
    with Zend OPcache v8.1.2-1ubuntu2.10, Copyright (c), by Zend Technologies
Configuring OPCache
To configure and enable opcache, we need to modify the default settings within the php.ini configuration file which you could find in the path below.
# for apache
/etc/php/7.4/apache2/php.ini

# for fpm and nginx
/etc/php/7.4/fpm/php.iniWhen accessing the file, modify the opcache configuration value to match the recommended configuration for production as explained in the official documentation.
opcache.enable=1
opcache.memory_consumption=128
opcache.interned_strings_buffer=8
opcache.max_accelerated_files=4000
opcache.revalidate_freq=60
opcache.fast_shutdown=1
opcache.save_comments=0
After modifying the configuration file, restart php to apply the configuration
# For apache:
sudo service apache2 restart

# For fpm and nginx (change the version to match your install):
sudo service php7.4-fpm restart
Benchmarking Result
The benchmark will be conducted on my work project site using the siege load testing tool using the following command, and it will run for approximately 10 minutes.
siege -v -c 25 -r 10 https://target_url/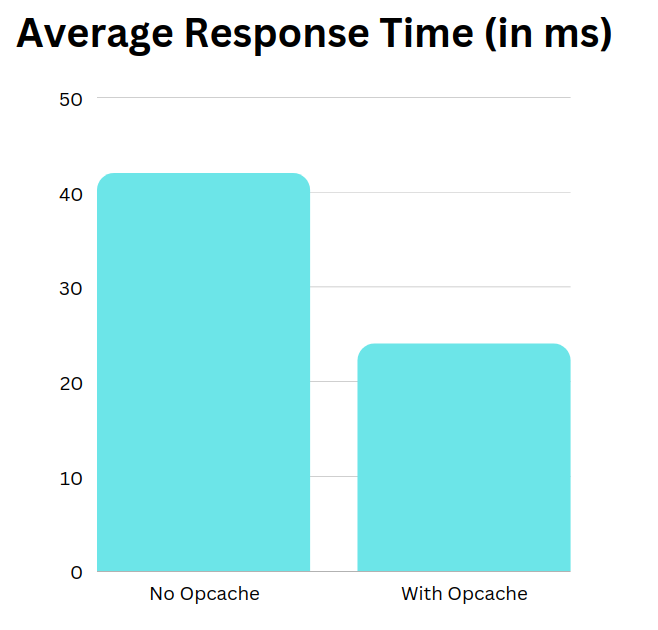
As you can see, I reduced the average response time of my site by 40% by using opcache.
Although your results may differ based on the kind of projects, server specifications, and other dependencies you have, as you can see from the result above, it's still worthwhile to give it a try.
Managing OPcache
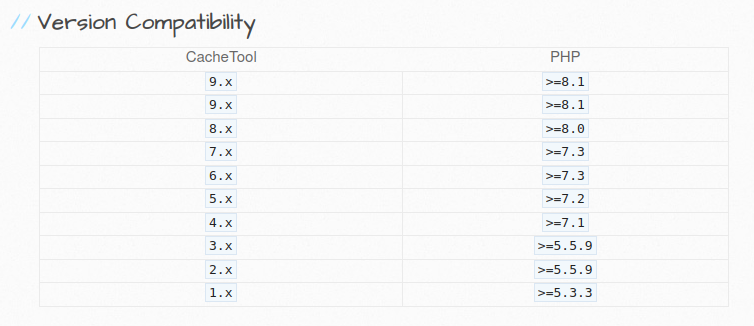
I advised using the CacheTool command line tool to assist with managing opcache. You might install it by using the command below and adjusting the version to one compatible with your system.
curl -sLO https://github.com/gordalina/cachetool/releases/download/7.0.0/cachetool.phar
chmod +x cachetool.phar
sudo mv cachetool.phar /usr/local/bin/cachetool
Test opcache, by executing the command:
sudo cachetool opcache:status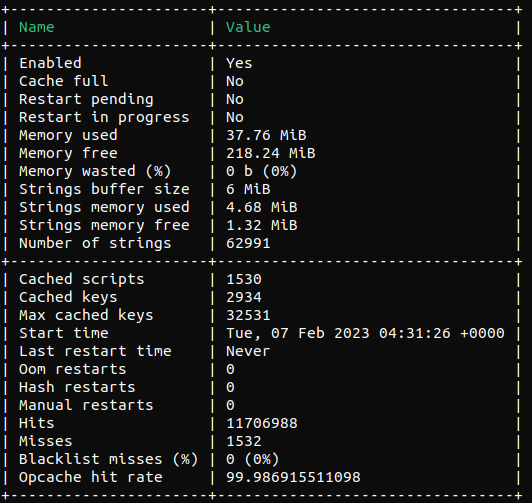
The most useful command for cachetool is the ability to flush opcache contents without the need to restart the php server.
sudo cachetool opcache:resetConclusion
After following the guide, we showed that opcache is able to improve your PHP web performance which will make your user more satisfied.